Did you know, that your car, van, SUV or other vehicle can be utilized as a virtual camper!? With a few tips and tricks, you will discover that your vehicle is a wonderful way to camp and travel not only on a budget, but in safety and style! Being we are Toyota Prius drivers, here are our tips for camping in your Prius.
KEY THOUGHTS
- There is not a handle to exit the Prius by the rear door from inside
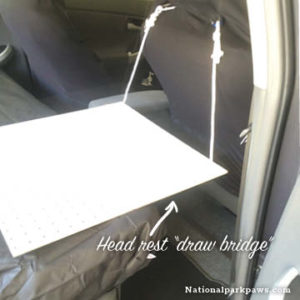
- Create a head rest “draw bridge” to extend the laying space
- Block out your windows with sun visors for safety
- Utilize window screens to avoid bugs entering the vehicle
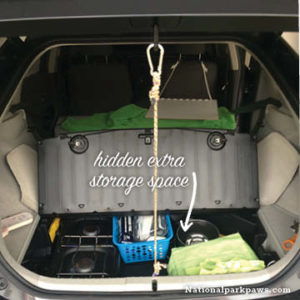
- Save space by utilizing containers and under seat storage
- You do not have to custom design or spend lots of money
- You CAN safely use your air conditioner or heater while you sleep (we did)
- You CAN lock your doors while you sleep with out setting off the alarm when exiting
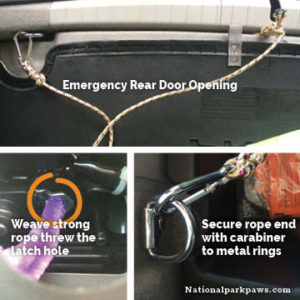
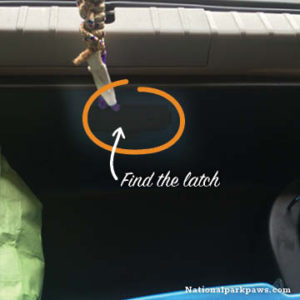
Find the Emergency Latch
There isnt a way to exit the rear door with out creating one yourself… You will need to locate where the latch is, it is near the rear bumper, in the center, on the inside of the vehicle. It is covered by a piece of plastic, carefully remove the plastic and locate the latch hole. Weave through a strong rope or plastic cable. I originally used a pipe cleaner (as shone in the image) and it broke pretty quickly, but it was the easiest thing to weave through the latch hole.
You can find information in the drivers manual about the Rear door hatch latch (Rhymes!).
Black Out Your Windows
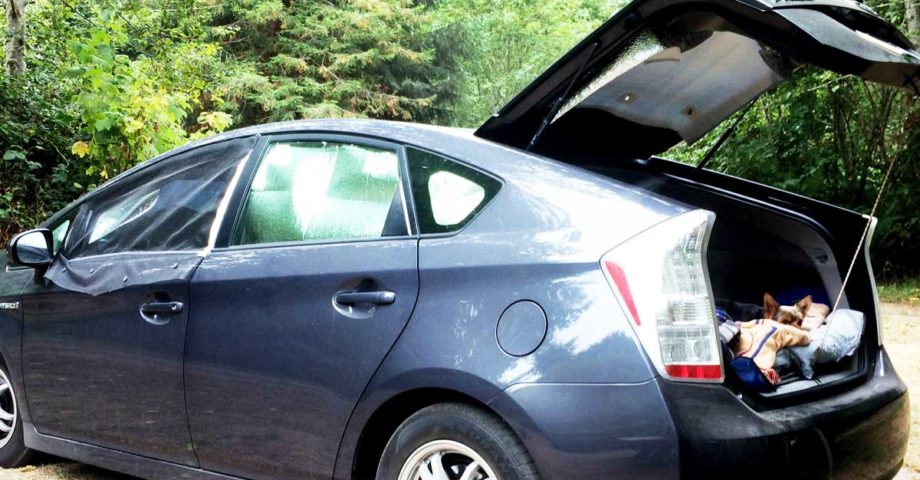
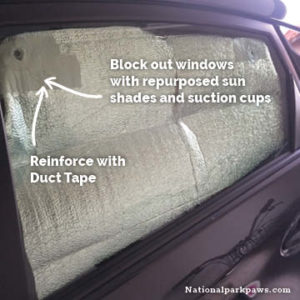
For safety, you will want to block out your windows. This will also help stabilize the temperature in your vehicle, by blocking out the sun when its hot, and holding in the heat when its cold. You can purchase expensive custom sunshades from the internet, or make your own for about $20!
SUPPLIES
- Sunshades (I purchased mine from Walmart for about $3 each and I used 4. They aren’t available online, but heres a link to some as an example
- Scissors
- Duct Tape
- Removable Scotch Tape
- Suction Cups
- Wrapping Paper
- Marker
- Pencil
Somehow, my pictures of making the wrapping paper template have been deleted, SORRY! So, I’m going to try and explain through text.
MAKE STENCILS OF YOUR WINDOW
- Cover one side window by taking a large sheet of wrapping paper and with the white side of the paper up, tape it to your vehicle
- Using a pencil, trace the outline of the window
- Carefully remove the wrapping paper, and cut out your stencil.
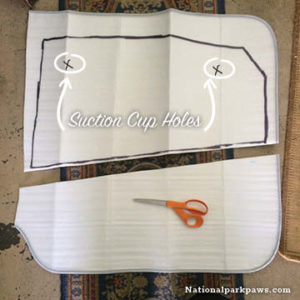
- Unfold a sunshade and lay it silver side down/white side up.
- Place your stencil on the sunshade (white side UP) on it and trace it with a marker
- It doesn’t not have to be cut to the exact size of the stencil, in fact, you might want to leave extra space, leaving more of the sunshade
- After tracing your stencil, cut it out. You will have the shape of your window.
- As shown in the image above, you will puncture holes into the sunshade, to insert suction cups. FIRST, you will place a piece of duct tape, on the front and back, THEN puncture a small hole, about the size of your scissor blades. The duct tape will reinforce it. The suction cups will fit nicely and be secured.
- You will then be able to stick your sunshades to your windows with ease.
- Continue with this method for all windows, excluding the front, as you will use the whole sunshade.
Window Screens
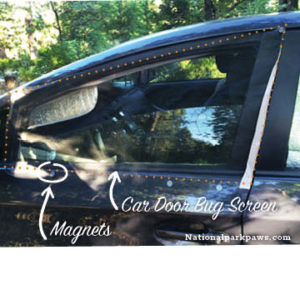 Again, you can purchase custom window screens online, but they will cost about $50 for each window! You can absolutely make them on your own with two methods… Sewing, or simply using magnets and screen fabric. I used both. A family member of mine used the sunshade stencils to make a screen that had an edge which would be closed into the door, and tied by the door handle inside, then used magnets at the bottom to secure it more outside.
You can also, simply cut a piece of window screen, which can be purchase as a roll at Home Depot, that is a few inches larger than your window, and then secure it to the vehicle with heavy duty magnets (you can purchase at a craft store).
I only used them for my front windows and this cost about $12
Headrest “Draw Bridge”
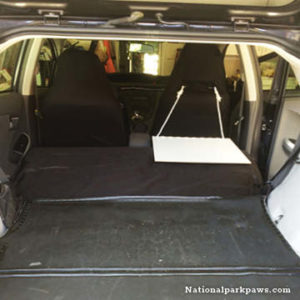
I call it the headrest draw bridge… cause, well… it looks like a draw bridge!
The draw bridge will give you about 1 foot more leg room. I’m 5 foot 7 inches and felt quite comfortable.
SUPPLIES
- Plywood or particle board – cut to 24″x24″ – You can have the wood cut at a hardware store such as Home Depot. I used a particle board that already had holes in it, so no need for drilling them. Please make sure you measure the space from the end of your rear seat to the console, to ensure proper sizing first. You will want the board to lay past the head rest as shown.
- Rope
- Carabiners
- Scissors
- Marker
After you have your wood/board cut to size, you will either drill holes in each corner or you already have holes, depending on what wood/board you purchased.
Feed rope through the holes, knotting the rope at the bottom of the draw bridge board. Leave enough rope to secure the carabiners to the ends.
The carabiners will latch to the front seat head rest. The rope should not have slack.
This method was so much easier than some of the custom designs I have seen online.
Storage
Utilize all areas of storage with bins and bags. I like to call the extra hidden storage below the rear door “the kitchen” being this is where I kept all of my cookware. Being its all hard plastic, its the perfect area for gear that might get messy.
The key is to pack light… But you will find more spaces for storage in the Prius than meets the eye.
- Utilize floor space
- Utilize storage bins to help compartmentalize items with different functions
- Use the space under your drivers seat to hide items or for lesser used items. This is where I kept tools and emergency supplies.
Bedding & Mattress
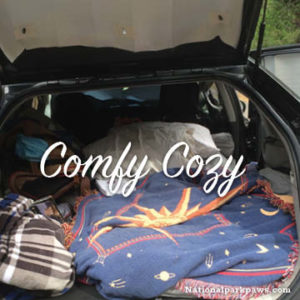
I used a 3 inch piece foam mattress topper that was purchased on Amazon.com. I then placed it inside a plastic mattress protection bag to keep the dust and dirt off it. I liked the foam a lot more than an air mattress, but please use what is preferable to you! A sleeping back and an extra blanket with pillow are the only things you should need. The car keeps well insulated, I was never that cold.
Using the Air Conditioner
It was a balmy summer night in the middle of Kentucky when I first tried using the AC while sleeping in the Prius. After a long day of driving, pit stops and attempting to get the car ready for sleeping in the dark, I just about had it and decided to try it out. Long story short – it was amazing!
I ended up using the AC on several occasions after that. I keep the windows closed and used the air conditioner all night. Make sure your car is in READY mode when doing this. I discovered tips for this on PriusChat.com. I never tried using the heat, but I would assume its a similar situation.
*Please note, that I can only tell you how this went in my own personal experience and recommend you discussing this with your Toyota dealer before doing so. DO NOT do this in a non-hybrid vehicle. You might want to purchase a portable carbon monoxide detector for your use and peace of mind.




Leave a Comment
8 Comments:
I just saw a video to give a bed more length in a Prius. Remove the headrest on the passenger side. Slide the seat all the way forward. The back of the seat will go all the way down.
Great help!
Great advice, Thx.
Thank you so much for the drawbridge idea! Cheap, simple, effective. My Lowes sells thin sheets of 24×24” plywood that work perfectly. I’m currently on a road trip and have been camping in my #tinyrv for 2 weeks so far. My drawbridge allows for more versatile storage below than the stacking bins recommended than others.
Thanks for your feedback, we’re glad you like our idea! Hope you’re having an amazing trip!
Hello, I don’t have any Idea how should I give you thanks for your Post. because of your Idea is the best for Car Camping. after reading your post I have understood this. thanks for sharing this kind of Informative post.
[…] Tips for Camping in a Prius from Dog Camp City […]
Thanks for sharing!